Some Advanced Papier Mache - Papier Maché Pulp Recipes
Warning: Due to some of the ingredients and techniques involved in this tutorial, this is not recommended for children without adult supervision.
Introduction
I've been making paper maché items since I was 13 years old. My Grandmother used to make bird houses and feeders that my Grandfather would laquer with the remains of a product he used for finishing car paints (he was a car mechanic).
Later on in life I got fascinated by the world of puppeteering (the muppet show is still in my top 5 favourite shows) and started my first trek in the business when I was 18. Eleven years later I'm still in the business and am still learning new tricks and tips on working with this wonderful medium that is paper mache.
One of the things that fascinates me the most is that to the contrary of many beliefs, paper mache isn't just paper and glue. There are hundreds of different recipes out there and most are as weird or simple as can be.
Here are a few that are my most used. They are all pulp recipes.
Finishing paper mache (porcelain finish)
You will need:
- 1/2 roll good quality white toilet paper
- 1 tablespoon raw linseed oil (boiled oil can also do the job)
- 2 tablespoons wallpaper paste
- 4 tablespoons white glue
- 1 tablespoon bleach
Instructions:
Rip, mix and apply... simple as that!
"Hard mache" (for strong pieces)
You will need:
- A big pot full of newspaper
- Water (to near the brim of the pot filled with the newspaper)
- Sawdust (about the same amount as your pulp newspaper)
- 2 cups of white glue
- Ground chalk (half the amount of your pulp)
- 2 tablespoons raw or boiled linseed oil
- Wallpaper paste
- 1 tablespoon bleach
Instructions:
Tear up the paper by shredding it by hand in basic squares like this. Don't use scissors, but rip them instead - since when you cut them with a blade you shorten the fibers of the paper, thus shortening the strength of the fabric once it's mixed together.
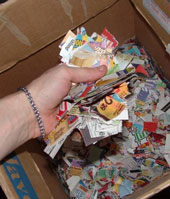
- Shredding by hand
Fill a pot of the shredded paper, then add water to about 2 inches from the brim. Boil it for about 3 hours. Afterwards, whisk it up (better still use a drill with a food mixer utensil fitted on it - the stuff is pretty hard on food mixer motors). Purge the water out by squeezing the mix in your hands over the sink or by using a filter like a window screen (better to wait an hour or two before purging the water out as the mix is very hot).
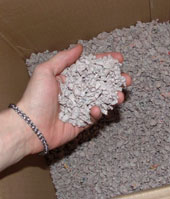
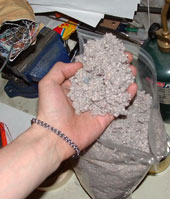
- Scrunch it up!
Take out a large window screen (I use an old double glass door one). Set it up over two chairs in a place that has good air flow and scunch it up in your hands with the paste so it falls in pieces. Rolling your hands together works pretty well. Leave it overnight. The next morning you should get something like this.
Get yourself a coffee bean grinder (they cost about 15$ for a cheap one) and put in a small handful at a time like so.
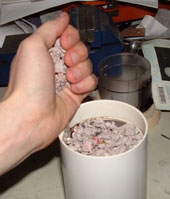
- Fill the grinder
- Grind!
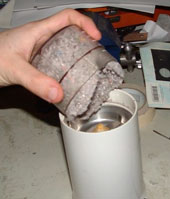
Grind the mix until the lid is full (it takes about 3 seconds).
Put it all in a plastic bag and keep it sealed until you need it. It gives a very fluffy (and a bit dusty I might add) mix.
- Finished result
Why give yourself all this trouble you ask? Well let's see.. hmm.. it's a lot easier to mix with the other compounds. It gives a paste that's a lot smoother than simple paper paste (less lumps) - and best of all it gives a lot more strength to your final pieces (I use it mostly for the final stage of paper mache furniture building).
When you are ready for it, mix in the rest of the ingredients. It takes a very good arm to mix all this once the sawdust and chalk are in. I suggest you use a drill in a deep bucket with a 1/2 inch rod with a small plate soldered to the tip like a reversed "T" to finish mixing your pulp.